

This page is designed to break down the pitcher’s motion through a visual array of pitchers. Your pitcher’s mechanics will not identically resemble these comprised pitcher’s as each individual will look different. A pitcher’s mechanics in softball is arguably one of the most difficult athletic challenges an athlete can master. Desire, being a student of the process, patience and hours of practice are required in order to become competent with these mechanics.
Step-by-Step Pitching Mechanics:
 Figure A
In figure A, the pitcher is tall on the mound. She receives the sign from her catcher. Take a stance on the pitching rubber that is comfortable. Stand tall, with your shoulders back, and your feet far enough apart for you to be balanced, hands at your side. The feet must be placed where the league and softball sanctioning associations require them to be. Typically that means that the front (throwing arm side) “push-off” foot must be placed at the front of the pitching rubber, and at least half of it must be on the surface of the rubber. The rear (or “stride”) glove-side foot can be behind the rubber. Some leagues, the ASA, the NCAA and others, require that the toe of the rear foot must at least touching the rear edge of the pitching rubber.
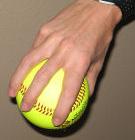 GRIP– Although there is no definite right or wrong way for a beginning pitcher to hold the ball, she should develop habits now in preparation for pitches that she will be developing later. Therefore, it is recommend that every pitcher start by using a “4-seam” grip…one that will cause the pitched ball to rotate top-to-bottom with all four seams cutting the air. For the basic 4-seam grip, place the pads of your fingers on the seams on the side of the “U” (horseshoe). Figure B
The pitcher should not grip the ball to tight or too loose. A tight grip
can cause the wrist to be more stressed impairing the pitcher’s ability to effectively release
the ball upon delivery. A loose grip can like wise impact the pitcher’s control as the ball could slip from the pitcher’s hand during any point of her delivery. An ideal grip can be demonstrated by a coach grabbing the ball from the pitcher’s grip. There should be slight resistance during this drill, but the pitcher should not clench the ball.
BRING THE BALL AND GLOVE TOGETHER – This is the part that follows the “Presentation” of the ball that we mentioned previously. Up to this point, your pre-pitch stance has kept your hands at your side. Most softball leagues and associations require that the ball and the glove must touch together (usually at least for one second) before starting the pitching motion. We recommend that you make the ball-glove contact close to where your hands have been hanging, in front of you, and below your waist.
 Figure C
 Figure D
 Figure E
STARTING THE MOTION – Although many pitchers have developed a habit of a lot of extra motion into the pre-pitch routine, bring your hands way above your head or bending over at this point are simply extra movement and energy that is being used, that will not really affect the speed or control of the pitch. We recommend…especially for beginning pitchers…that you start with your hands low, keep the ball-glove touch below the waist, and then go right directly into your backswing.
BACK-SWING – Figures C, D and E are excellent portraits of the fundamentals expressed here. The speed or height of your backswing are not important, although a reliable height would be to have the ball hand at least above your waist. Do what you feel is comfortable. Typically, most pitchers will bring the ball out of their glove and swing back to a point where the arm is approximately level. If it feels more comfortable, take the arm back at a somewhat slower speed. The only time arm speed counts is when it is going forward, especially during the final downswing just before the release point.
FORWARD MOVEMENT…WEIGHT TRANSFER – After your arm does its backswing, as it starts coming forward, so will your body. The purpose of the “body lean” (described elsewhere on this website) is to start the transfer of your body weight from your rear leg to the forward “push off” foot.
THE PUSH OFF – It will be the push against the front edge of the pitching rubber that starts the drive outward, the long step, and the resulting speed of the pitch.
 Figure F
  Figure G
Figure H
THE STRIDE – Figures F, G and H represent the pitcher’s stride. The step that you take with your glove-side foot is often referred to as the “stride”. Although there is much disagreement among pitching instructors on this issue, we have found that in most cases, those pitchers who have a longer (and faster) stride throw a better fastball. (NOTE FOR BEGINNING PITCHERS: Wait a while before your start practicing with a longer stride. Practice the basic mechanics of pitching first…you can start lengthening the size of your step several weeks or months from now.)
How long should the stride be? Although this is something that must be right for the pitcher, a typical stride for a leaping-style pitcher is 90% to 120% of her height. We encourage our pitchers to stride five inches or more beyond their height. Therefore, a 5’6” pitcher will often stride 6 feet or more.
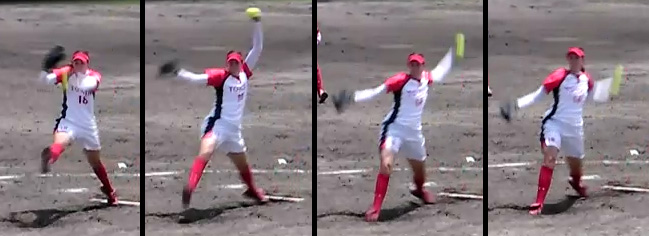 Figure I
 Figure J
 Figure K
 Figure L
 Figure M
CLOSE/OPEN STANCE Figures I-M provide ideal examples of the close/open stance while incorporating the finishing stages of the delivery. demonstrate the Close/Open Stance: This is the most difficult part of learning to pitch. When you are standing on the pitching rubber facing the catcher, you are in a “closed” position (imagine yourself as a door as seen by the catcher, you are “closed”). As you take the long step forward, approximately halfway through your arm rotation you will be in an “open” position, entirely sideways to the catcher, your body is opened to third base. Then as the arm comes down in the final swing toward the release, the upper body, then the hips will start to “close”. However, as you will read below, the hips should only be approximately halfway closed at the precise release point of the ball. Then, after the release, the hips will continue to close, allowing the pitcher to finish in the “ready” position facing the batter.
NO “LEAPING” – All pitchers will either take a long step or “leap” out to get better distance. However, all organizations sponsoring girls softball do not allow a pitcher to become airborne during the pitch. It is illegal to have both feet in the air at the same time. That is why pitchers who use a “leaping” style must also “drag” the toe of the push-off foot on the ground until the stride foot touches down. Typically, this toe drag will be on inside of the toe of the shoe, and will make an arc pattern in the dirt starting at the pitching rubber and continuing toward the glove side for a foot or more. Often times a pitcher’s control is adversely effected during the athletic stride. The pitcher should remain on a straight line towards home-plate during her close-to-open stance. Check during practice to determine if the pitcher is on a straight line to home-plate. Inexperienced pitchers often will land glove side of the line.
 Figure N
THE RELEASE – There are several important things that need to happen as the arm swings down toward the release point…and they need to happen at the same time:
Keep the wrist back as your arm approaches the release point so it can automatically whip forward at the precise instant you release the ball.
Keep your arm outstretched, but not stiff, as you release the ball. Do not allow your elbow to bend more than 15 or 20 degrees.
“Snapping” – Although you might have been told to “snap the ball”, do NOT try to snap your wrist forward at this point. It can cause timing problems, and often cause you to pitch high. Instead, seen #18 above, and “whip” your arm down through the final part of the arm rotation and through the release of the pitch. Your hand is at the end of your whipping arm, so it will whip forward at the precise release of the ball…consequently giving you a better snap than if you try to do it, and it happens automatically.
Fingers behind the ball – You can get better speed and control if your fingers are behind the ball as it leaves your hand. We often tell pitchers to think of it as “pointing the inside of your wrist toward the catcher.” Some pitchers are taught to “roll the ball over” as it is being released in order to get a slight curve or drop on the fastball, but we recommend against that. The “over-the-top” release is often used by men pitchers. We do NOT recommend it for our students, and feel it could be injurious to young or smaller pitchers.
Stay tall at the release. Bring your shoulders back as your pitching arm starts its final downswing toward the release point, so you can be upright and tall at the finish. Do NOT bend at the waist. Bending slows down pitching speed, and often causes pitches to go high.
Keep your shoulders level as you release the pitch. Do not dip down on the throwing-arm side.
THE FOLLOW-THROUGH – This is another of those areas where pitching instructors often have differing opinions. Our recommendation is to let the arm go where it wants to naturally. At the instant the ball has left your hand, allow your arm to relax, bend, and follow through straight ahead. For most pitchers who use the fingers-behind-the-ball and inside-of-the-wrist-toward-the-catcher method, the arm will bend slightly, then follow though straight ahead (not across the body) with the pitching hand finishing up somewhere waist-high or above, and moving toward the bicep or shoulder.
 Figure O